Here are some important things to keep in mind.
Shutter Speed: Shutter speed is how long the sensor in your camera is exposed to light. To maintain the film look of shooting videos with your DSLR, you want to make sure your shutter speed in synchronous to your framerate. If you are shooting in 24p or 25p you will want to set your shutter speed to 50 (1/50th of a second). Shooting in 30p, set your shutter speed to 60 or 1/60th. 50p or 60p, shoot at 100 and 120 respectively. These setting will give you the best looking video.
*E***For extra credit:** Check out Tyler Ginter’s super useful and detailed blog post about understanding shutter speed.
ISO: ISO is a camera setting that changes how sensitive the camera’s sensor is to light. The higher the ISO, the more sensitive the sensor will be, which allows you to shoot better images in low light conditions. It’s a good idea to keep your ISO as low as possible for the best looking image. Sometimes, you’ll need to bump it up a bit if there isn’t a lot of light.
Good ISOs: 160, 320, 640, 1250, and 2500
Bad ISOs: Avoid using: 125, 250, 500, and 1000. These ISO settings create noise and make your footage look grainy.
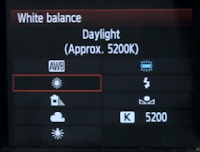
 White balance is the process of capturing the correct colors for the type of available light. Think of it as making sure the color white is always white, and doesn’t have blue or red tints. Many cameras come with an easily understandable white balance menu, as well as an auto white balance feature. Use the presets for whatever condition you’re shooting in.
 Depth of Field: (DOF) refers to the part of your image that is in focus. A deep DOF will show nearly everything in the shot sharply in focus. If you have a shallow DOF, a narrow range with in your video image will be in focus. A shallow depth of field allows for greater emphasis to be placed on your main subject.
Using slow, and controlled movements while your camera is attached to a tripod will give you the best shots. A good technique to try when you pan from side to side is to hold your shot for about ten seconds, then start your slow pan, and then hold your shot another ten seconds before cutting. This gives you three different shots to work with when it comes time to edit!
*E***For extra credit:** Go outside and shoot some footage with your white balance at different settings. What happens when you put your white balance to tungsten if it’s sunny outside? Experiment!
Ready for a challenge?
So do you feel confident enough to go out and shoot something? Door4 has a great starting challenge for you called “An Object.” Find an object and film it so that it’s interesting! Use all the techniques you learned, keeping in mind your white balance, ISO settings, and frame rate. Keep your video under two minutes and really push your boundaries with framing and DOF. Link your video here.


No comments:
Post a Comment